New publications
Strong abs? Easy!
Last reviewed: 04.07.2025

All iLive content is medically reviewed or fact checked to ensure as much factual accuracy as possible.
We have strict sourcing guidelines and only link to reputable media sites, academic research institutions and, whenever possible, medically peer reviewed studies. Note that the numbers in parentheses ([1], [2], etc.) are clickable links to these studies.
If you feel that any of our content is inaccurate, out-of-date, or otherwise questionable, please select it and press Ctrl + Enter.
Crunches are the most popular abdominal exercise for one reason: anyone can do them. But that doesn’t mean they’re the most effective. Think about it, would you rather do an exercise that housewives do or an Olympic athlete?
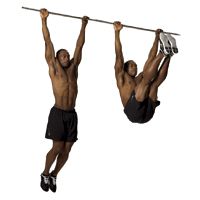
Start doing hanging leg raises. Consider this exercise the gold standard of all abdominal exercises, just like the pull-up is for the back. While most athletes probably never get tired of crunches, they have been doing variations of the hanging leg raise for decades. This exercise is done like this: You hang from a bar and lift your legs up to your chest. It seems like it’s too hard. Doing it correctly requires strength, endurance, and flexibility (your abs, back, and hips), as well as a strong grip.
But don’t let that scare you. We’ve created a 5-step plan to help you reap the benefits of the best ab exercise ever. Here’s the secret: the process of developing the strength and flexibility to do this exercise is almost as effective as the exercise itself. Follow our plan and you’ll soon see why the guys with the best abs in the gym are always the only ones doing hanging leg raises.
Test your strength
Count how many times you can raise your legs while hanging on the bar with perfect form. If you can do it at least once, follow the instructions and move on to the next steps. If you can do more than one lift, skip to step #5.
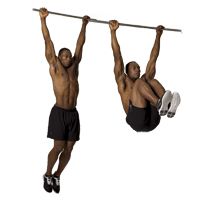
Hanging Leg Raises
Hang from a pull-up bar with an overhand grip and your hands slightly wider than shoulder-width apart. Simultaneously bend your legs, lift your knees toward your chest, and bend at the waist as if you were lifting your hips toward your chest. Pause for a second when the front of your thighs touch your chest, then lower your legs and repeat.
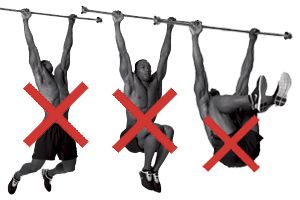
- 3 most common mistakes
- Performing jerks (using the body's momentum). Try to look straight ahead at all times - this will allow the body to remain in the correct position.
- Simply bending and lifting your legs. Instead, imagine tucking your legs underneath you.
- Lean back. Your shoulders should remain in one position or lean forward slightly.
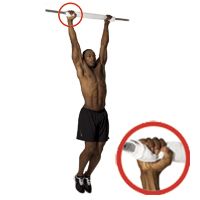
Create a soft support for your hands
As the name of the exercise suggests, hanging leg raises involve hanging from a bar.
Calculate how long you can do this, grab the bar with an overhand grip and hang on for as long as possible. If you can hold on for at least 30 seconds, move on to step 3. If not, place a soft cloth under your hands (as shown in the picture below). This way, you will ensure that a weak grip does not limit your reps. Do this at the end of your regular workout 2 or 3 times a week for 6 weeks. (Note: Exercises from steps 2, 3 and 4 can be done in the same workout).
Arm pads
Wrap a towel around the bar, then grab it with an overhand grip. Hang with your arms straight as long as possible. Rest for 1 minute. Then repeat 2 times. Try to hang for at least 5-10 seconds with each exercise. If, for example, you can hang for 20 seconds, move on to the next exercise, and try to hang for at least 25 seconds.
Improve your flexibility
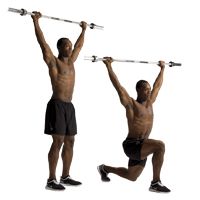
To lift your legs to your chest, you need a flexible lower back and hip flexors, the muscles at the top of the front of your thighs. When they’re tight, these muscles lose range of motion and the ability to generate force. Test your flexibility with this simple exercise: Stand with your back against a wall, feet about a foot away from the wall. Make sure your lower back, shoulders, and hips are flat against the wall, then slide your hand into the crease between your lower back and the wall. If you can only fit a few fingers in, skip to step 4. If you can easily fit your entire hand in, you have a flexibility problem. To help, perform overhead lunges 5 or 6 times a week, either before your workout or on rest days.
Reverse lunges with overhead barbell raises
Hold a light barbell or gymnastic stick with an overhand grip that is twice as wide as your shoulders. Raise the barbell overhead with straight arms, step your left leg back, and squat until your right leg is bent at a 90-degree angle. Return to the starting position and repeat, this time stepping your right leg back. That's one rep. Do 2 sets of 12 to 20 reps, resting 30 seconds between each set.
Develop your strength
The key is to do exercises that will strengthen your abs and hip flexors together without putting strain on your back. Use the 6-week workout schedule below to prepare for leg raises. Once you can perform at least one rep with perfect form, move on to step #5.
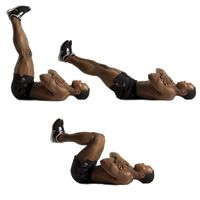
Lowering the legs while lying on your back
Lie on your back with your legs slightly bent, perpendicular to the floor. Press your back to the floor and avoid arching your lower back. Keeping your back in this position, lower your legs (this should take 3-5 seconds). Once you reach the lowest point where you can keep your back straight, lift your legs again. Try to lower your legs lower with each new repetition.
Hanging Leg Raises
Hang from a pull-up bar or use a vertical stand to lift your knees. (Do not allow your back to press against the soft support.) Raise your right leg. Keep your torso stable (do not lean forward) and do not lift your left leg. Once your right leg is as high as possible, pause for a second, then lower your leg back to the starting position. Repeat with your left leg. This will count as one repetition.

Weeks 1 and 2: Perform only the leg lower exercise 3 days per week. Perform 2 sets of 6 to 10 reps, resting 30 seconds between sets.
Weeks 3 and 4: Do both exercises 2 times a week. Do 2 sets of 10 reps of the leg lowering exercise. Then do 2 sets of 6-8 reps of the single leg hanging raise. Rest 30 seconds after each set.
Weeks 5 and 6: Perform 1 set of 8-12 reps of each exercise, rest 30 seconds, then repeat 2 sets of each exercise.
Improve your stamina
Perform as many hanging leg raises as you can, then rest for 30 seconds. Repeat the exercise 3 times. This counts as one set. Perform 2-3 sets – resting 60-90 seconds after each – 2 or 3 times a week. Rest no more than 5 seconds between reps each week until you can perform 10 reps without resting. Then you will be able to perform the exercise below.
Hanging Trunk Bend
This exercise is performed like a regular hanging leg raise, except you should not bend your legs as you lift them up. At the top position, your feet should almost touch the bar you are hanging from. Start with two sets of 4-6 reps – resting 90 seconds between sets – and increase the number of reps as your fitness improves.
Hanging Leg Raises
Start by doing hanging leg raises. Pause at the top and rotate your lower body to the left, tilting your right hip toward your right armpit, then repeat on the other side. Return your legs to the center position, then lower them. The number of sets and reps is the same as in the previous exercise.
